
Getting extend volume greyed out problem on Windows 8/10/11? If your answer to this question is yes, then no need to worry as this blog covers everything that you will need to get out of this problem.
As you already know that Windows comes with inbuilt Disk management Tool that is used to make partitions on the hard drive. But in spite of its explicit features of creating, deleting, and expanding volumes, the users are reporting for extend volume option is greyed out issue on Disk Management tool.
Well if you are one of the users getting the same issue then go through this blog to get past the problem in no time. But before proceeding directly to the potential solutions, let’s just have a quick overlook through the causes occurring this issue.
What Cause Extend Volume To Be Greyed Out?
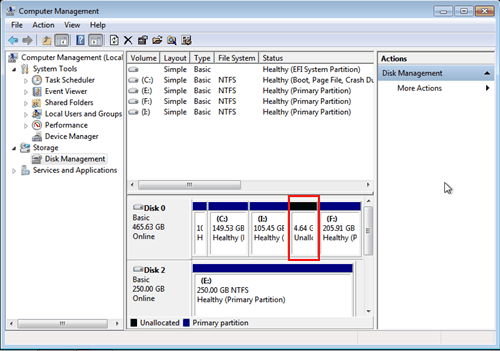
- Absence of unallocated space on your Hard drive.
- The volume you want to extend is not a NTFS or Raw partition.
- No unallocated space available behind the partition that you want to extend.
So these are few causes that triggers this problem to arise. Now as you aware of the culprits, it won’t be any difficulty for you to fix the problem with below mentioned solutions.
How To Fix Extend Volume Greyed Out on Windows 8/10/11?
Method 1: Remove the Partition From Between
The first thing you can try to fix the problem is to remove the partition from between if any available. You can do this by following below guided steps:
- Firstly hold Win+X keys altogether and go for the Command Prompt.
- Next on the cmd panel give the command “diskpart” to open DiskPart utility.

- Once opened, type the command “list disk” followed by “select disk X”. Doing this will let you choose your disk.
Note: [X refers to the disk number]
- After that, give command “list partition” and hit Enter.
- Now choose the partition in between and give command there “select partition X”.

· Note: [X here refers to partition number]
- Next remove the partition by giving the command “delete partition override”.
- Finally you can now easily able to expand the volume once the override partition gets deleted.
· Method 2: Make Unallocated Space
To wipe out the extend volume greyed out problem you need to create some unallocated space. To expand the partition, you must have the unallocated space on your system drive. So in order to create some unallocated space, you have to first delete the partition that is not in use. And also you have delete the empty volume or partition.
Moreover, instead of deleting the partition, you can also go for shrinking the partition to create some new allocated space on your system drive.
However, make sure that the volume you want to expand or the unallocated space are not next to each other, then you would not be able to expand the volume at all.
Method 3: Delete The Volume Greyed Out Disk
Most times the new volume greyed out problem occurs due to insufficient storage space on disk. This situation demands deletion or shrinking of volume greyed out disk to left the free or unallocated space next to the target volume. To do so, follow the below steps:
- Firstly, hold the Win+X keys simultaneously and select the Disk Management option.
- Next right click on the empty partition next to the targeted volume.
- Now tap on Delete Volume> OK.
- You may also right click on the neighbor partition that carries enough space and tap on Shrink volume option.

- Here you have to mention the amount of disk space to which you want to shrink.
- And lastly, click on Shrink and then OK for confirmation.

After shrinking or deleting volume greyed out disk, you need to expand the Partition size. Follow the below quick steps to do so:
- Go for Disk Management, right click on targeted partition that you want to expand.
- Select “Extend Volume” and manage the size you want to add to the targeted volume.
- Next click OK for confirmation.
Method 4: Try Converting MBR Disk To GPT
If on applying above methods won’t get you out of this problem, then in that case try converting MBR disk to GPT to break the limit.
In most situations, if the made single volume reaches to 2TB volume size, then you would not be able to further increase the partition. This is the situation, when the extend volume option greyed out. So it is necessary to convert MBR disk to GPT to get past the issue.
Method 5: Change The Partition Format
To increase the size of the partition, you need to have the correct drive category which Windows can easily format. Windows can only expand the NTFS or RAW format partition. In case of FAT32 category, you need to first change the format to NTFS or RAW, then only the Windows can expand it.
So the first thing you have to do is to check the drive format that you want to extend. For this, follow the below steps:
- Hold Win+R keys altogether to launch Run dialogue box.
- Then on the Run, type diskmgmt.msc and hit Enter to open Disk Management.
- Once launched, you can view the drives list there.
- Now, right click on the troublesome drive and click on Properties option.
- There you can view the format under File System section.

If found the format FAT32, then you cannot extend the portion. You need to change the format type to NTFS to expand. Here are the steps to do so:
- Launch Disk management as guided above.
- Right click on the troublesome drive, and select the option Format.

- Now change the File system to NTFS format.
- After that check mark the box stating “Perform a quick format”.
- Then click OK for confirmation.

Once done with above process, you can now easily extend volume greyed out with unallocated space.
Final Words
Well dealing with such problems might sometimes be hectic. Therefore the blog contains each crucial points that is necessary to get you out of the extend volume greyed out problem.
I hope the blog turns out to be helpful thereby helping you to extend the greyed out volume in to time.


0 comments:
Post a Comment