GoPro SD card errors are the common problem and can be easily handled. However, the SD card error flashes with different error message referring different scenarios.
Hereby, we have come up with this article that will let you understand the different SD card errors and their causing source further providing you the effective solutions to deal with the error issues.
So keep reading the blog to understand the error better and know the potential fixes to resolve the problem with least efforts.
Some Of The Common GoPro SD Card Errors-
· GoPro “NO SD” or “SD ERR” Message
· GoPro “SD card is full” error
· GoPro memory card abruptly not working
· GoPro SD Card Error “SD card is empty”
So, these are some GoPro SD card errors that you may encounter.
GoPro “NO SD” or “SD ERR” Message
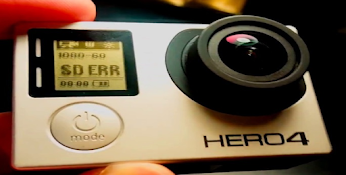
“NO SD” or “SD ERR” error message shows up when your GoPro camera fails to recognize or detect SD card. Hereby, this case requires your SD card to be inserted properly into the camera. For this you need to remove the SD card and then insert it back properly into the camera to deal with the GoPro SD card error problem.
GoPro “SD card is full” error
Another error is GoPro “SD card is full”. You get this error due to wrong SD card file system. So, here you can deal with the situation by formatting your memory card to restore it to normal state. But remember formatting can cause data loss on SD card. So, make sure to have backup of your SD card data before proceeding for formatting.
GoPro Camera SD Card Abruptly Not Working
The GoPro memory card abruptly not working error generally occurs when your card is being used frequently on numerous devices or is old. Also, using inferior or cheap memory cards to save high quality videos can trouble you with GoPro SD card error hero 7. Therefore, it is always advised to use high quality SD cards to avoid getting such errors on your GoPro camera.
GoPro SD Card Error “SD card is empty”
“SD card folder is empty error” is another error that appears due to corrupted or malfunctioned SD card. Mostly the SD cards got corrupt due to virus. But sometimes interrupted transfer, improper handling, etc can also end up corrupting your memory card. Using corrupted or damaged SD card can makes files unreadable thereby giving you “SD card is empty” error.
What Causes GoPro SD Card Errors?
- Poor connection
- Using inferior SD card
- Corrupted/damaged memory card
- Virus Infected
- Inappropriate ejection of the memory card
- Removing the SD card from the device while file transferring
How Do I Fix GoPro SD Card Errors in Hero 7/5/4?
Solution 1: Check The Connection
Checking the connection between your memory card & GoPro camera can fix GoPro Hero 7 black SD card error. Make sure that your SD card is been inserted properly into the camera. If not, then follow the instructions below to resolve the error issue:
- Take out the SD card and clean the gold-plated parts on memory card with a rubber or toothbrush.

- Now, clean the card slot in the GoPro.
- Turn off the camera and turn on again to avoid temporary issues.
- Next, insert the SD card back into the camera properly and verify for the error problem.

Solution 2: Use Different SD Card
Another reason triggering such error is using inferior quality memory card. So, try using superior quality SD cards instead of inferior ones to avoid facing such error issues. Also, low quality card can slow down the read/write process thereby taking longer time than usual to process the stored data.
Therefore, use high-quality cards to have a quick read/write speed and to avoid GoPro 7 SD card error.
Solution 3: Scan the SD Card Errors
If the memory card that you are using got corrupted or malfunctioned then you might encounter this error. So in order to fix the error, check your SD card errors with chkdsk. Follow the steps below to repair GoPro SD card errors via chkdsk:
- Insert the card reader into the system along with memory card.
- Next, go to Start and select computer.
- Locate the SD card under Devices tab as removable disk.
- Go for the Start menu again, and type cmd on the search box.
- Now, on the appeared result, go for Command Prompt and make a right click and choose the option Run as administrator.

- Now, on the cmd give the command “chkdsk” followed with a drive letter and further type /f:r/f and press Enter.

- Lastly, wait until the chkdsk search for the errors and repairs them.
Final Words
Well, GoPro SD card error is a common problem that can easily get resolved with few simple fixes. However, the blog covers all the relevant topics that will help you to understand the error in details thereby further solving it with mentioned effective fixes.
I hope, the blog serves you well thereby letting you resolve GoPro SD card error in no time.